Are you planning to design your real estate website using WordPress? This guide is for you. I will show you step by step how to create your WordPress website from scratch, the tools needed, and tips on how to create hundreds of pages programmatically that target region-based keywords or import your listings in bulk at scale.
Tech Stack Overview
Before we delve into the specifics, let’s take a moment to review the tech stack we’ll be using for this project:
- CMS: WordPress
- Hosting: Local Environment
- Theme: GeneratePress
- Plugins:
#1: Dataset Preparation
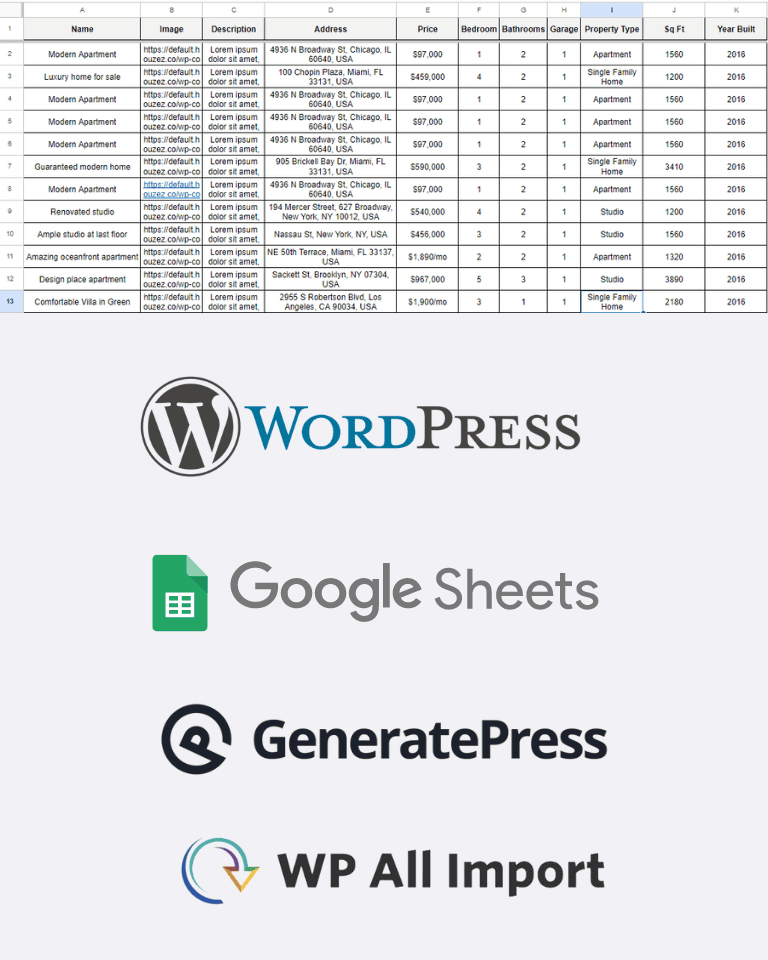
The first step in building our SEO-friendly real estate website is to prepare our dataset. Quality data forms the foundation of any successful website. For this tutorial, we’ll be working with a sample dataset consisting of 12 real estate listings with 11 variables.
Depending on your SEO strategy, you could use your website to target local keywords and capture leads or create listings for your clients who are selling their homes.
In the first case, focusing on Local SEO:
Creating several pages at scale targeting states, cities, or regions could be done programmatically to save time. Designing these pages manually would be too time-consuming and costly.
Keywords like “sell your home in New York” or “sell your house fast after fire in California” are long-tail keywords with low search volumes. If your agency is willing to capture leads through forms or phone calls targeting these keywords, then this is the right strategy for you. You can easily swap out modifiers, such as city names (e.g., “New York” to “Los Angeles”).
In the second case, Directory listings:
If you have many listings from your clients and need to import them manually, it’s going to be painful and costly. Instead, you should have their data prepared in a spreadsheet, for example, in Google Sheets. Then, design a content template (the layout of your listings). Finally, using the WP ALL IMPORT plugin, import your listings at scale.
#2: Setting Up WordPress Environment
Once our dataset is ready, we’ll proceed to set up our WordPress environment. This involves installing WordPress locally and configuring it with the GeneratePress theme, which offers flexibility and performance.
On your WordPress Dashboard, click “Appearance,” then “Themes.” From there, you can search for GeneratePress and click “Install.”
There are many WordPress themes in the Real Estate Niche, both free and paid. However, for this example, we will be using GeneratePress along with its Gutenberg builder, GenerateBlocks. We will need it to design our custom fields using their dynamic data feature.
#3: Creating Custom Post Type
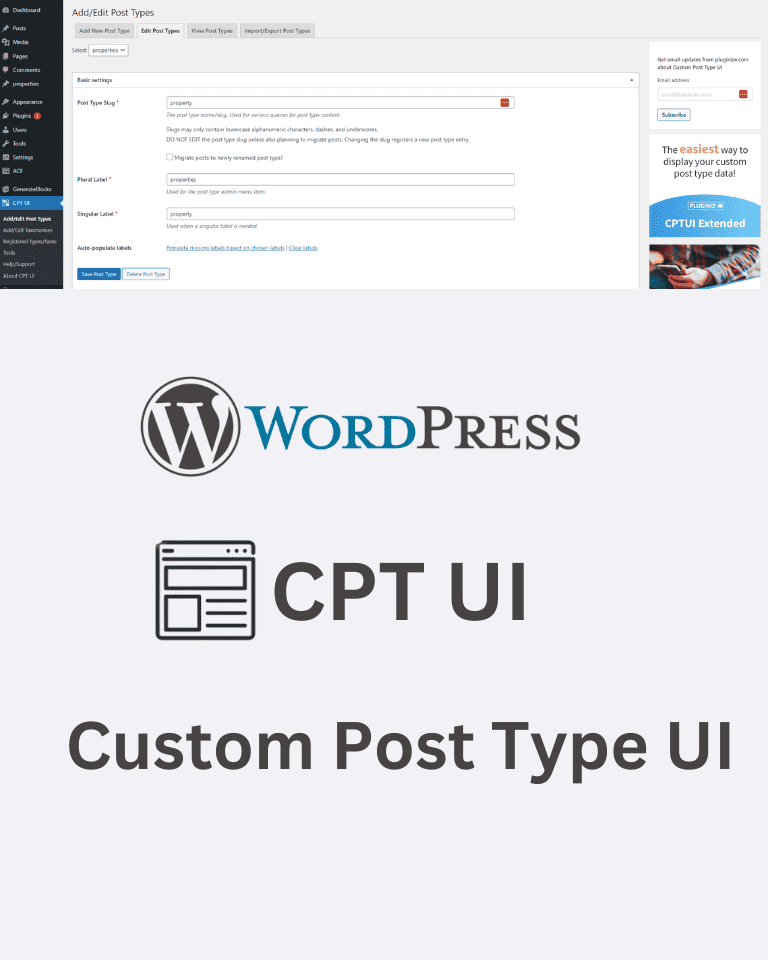
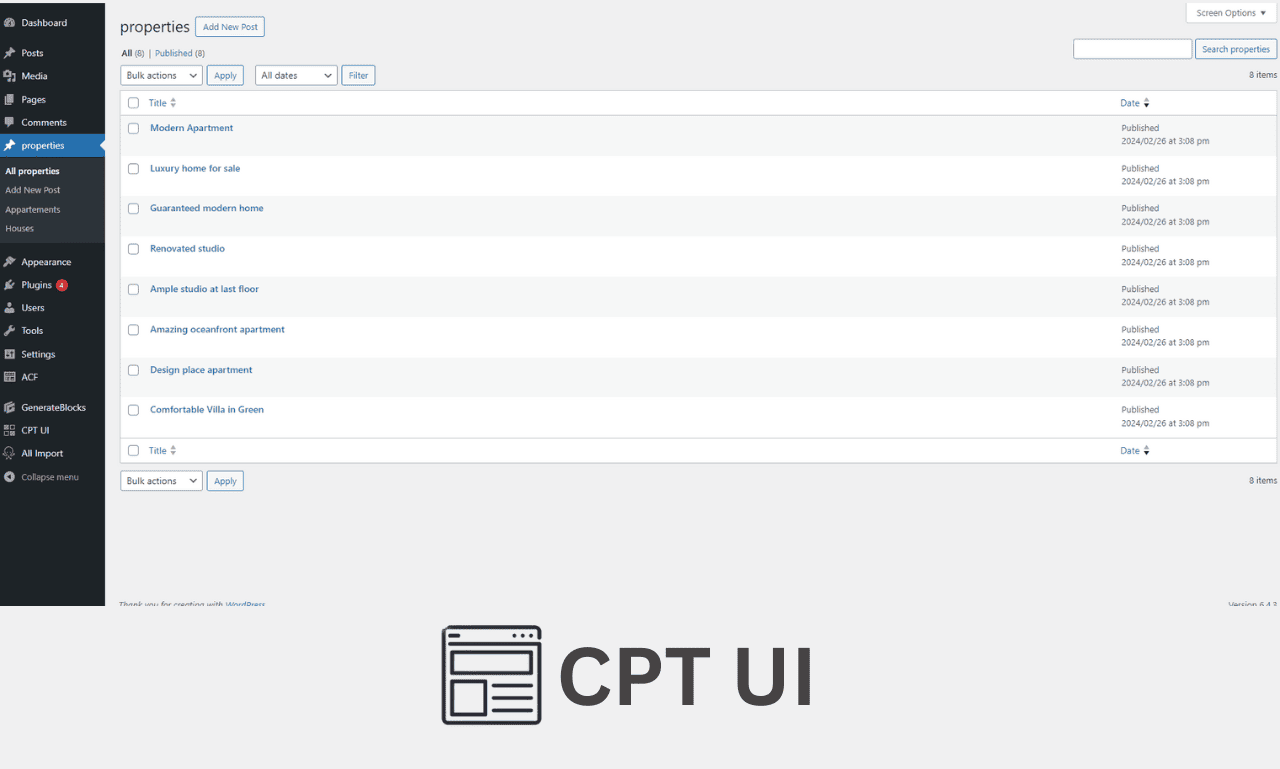
With WordPress up and running, we’ll use the Custom Post Type UI plugin to create a custom post type named “Property.” This custom post type will accurately represent our real estate listings and provide the necessary structure for our website.
On your WordPress dashboard, head to the tab CPT UI. From there, you need to write down the post types, such as the slug responsible for all your URLs related to this custom post type, the plural label, and the singular label. In our case, we write ‘properties’ and then ‘property.’
You have lots of options to choose from. You could choose the icon of the custom post type, the numbering on the left side of the menu. You could display it under posts, media, or pages, and also you could set what these post types will support, for example, categories, tags, authors, and other fields, and then click ‘add post type’ when you’re finished.
You could also add taxonomies using the same plugin; just select the second tab ‘add or edit taxonomies,’ and then from there, you would need to select their slugs, plural label, singular label, and then attach it to the custom post type properties by thickening the box that is related to properties and add the taxonomies. For example, you could add apartments, houses, locals, or any other taxonomies.
#4: Defining Custom Fields with ACF
To further enhance the functionality of our real estate website, we’ll utilize the Advanced Custom Fields (ACF) plugin. With ACF, we’ll define a field group for our “Property” post type and set up custom fields such as property name and image fields with URL capabilities.
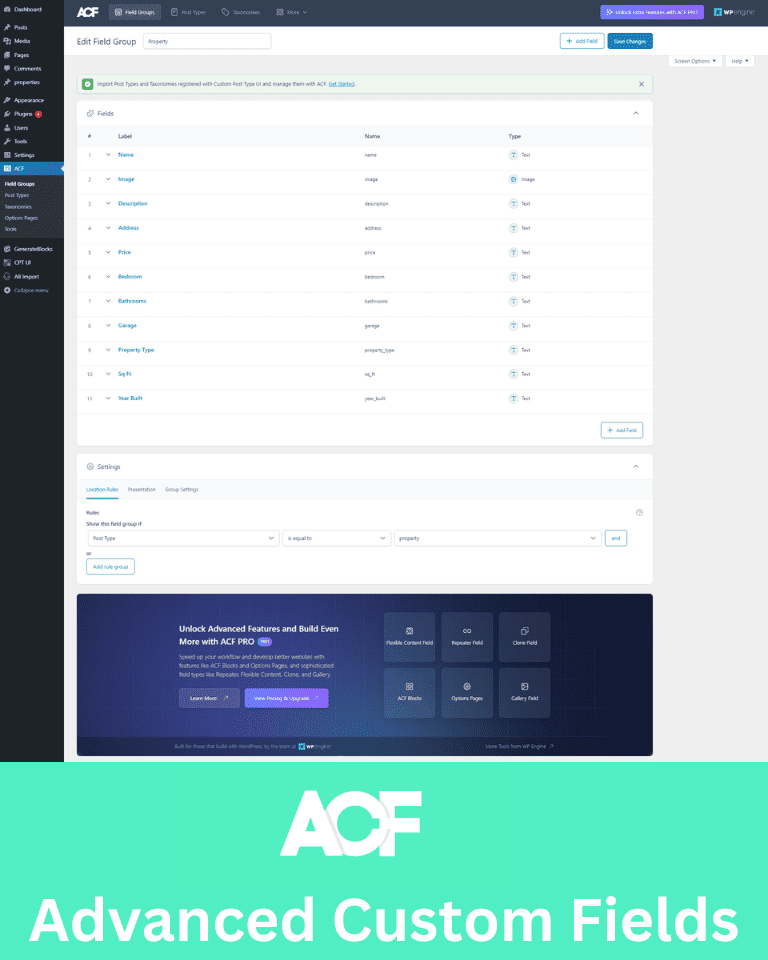
On your WordPress dashboard, navigate to ACF (Advanced Custom Fields) and then create a new field group. Name it “Properties,” and proceed to create your custom fields. Start by adding fields for the name, description, address, price, bedrooms, bathrooms, garage, property type, square feet, and year built.
All of these fields should be text fields. Additionally, add an image field and set the post type as an image. For the return format, select “thick image URL.” Ensure that the settings specify the post type as “property,” not a blog post, and then click “Save Changes.”
#5: Importing Data with WP All Import
Now that our custom post type and fields are in place, we’ll import our prepared dataset into WordPress using the WP All Import plugin. This plugin allows us to map the columns from our CSV file to the corresponding fields in our “Property” post type, streamlining the data import process.
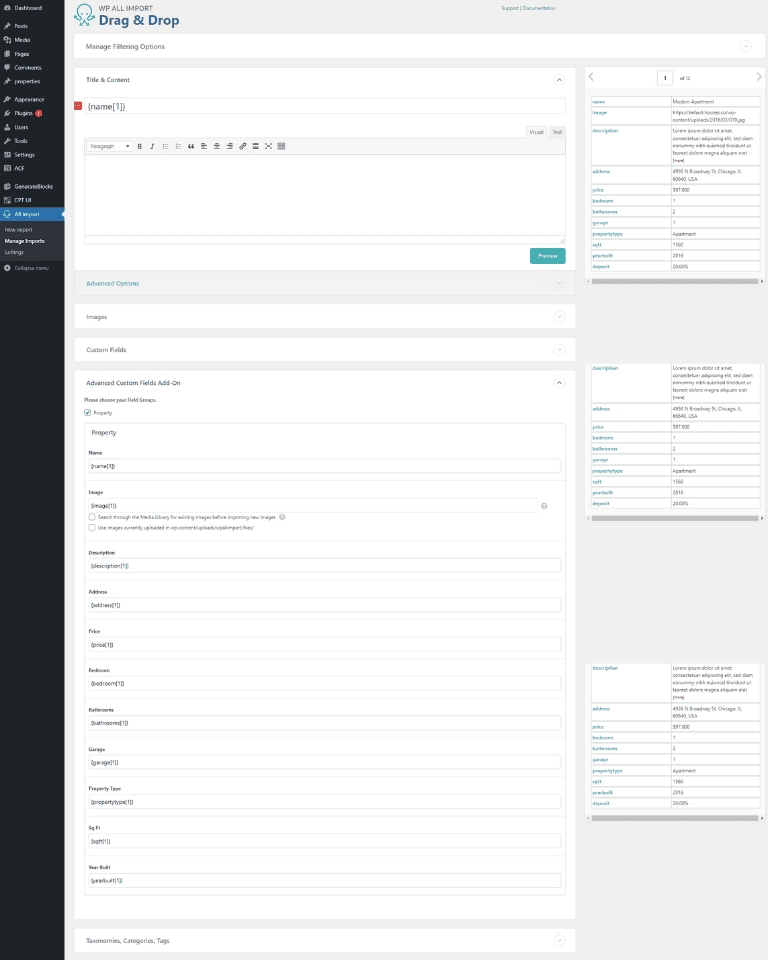
When you have all your data records ready, save the spreadsheet in CSV file format. Then, on your WordPress dashboard, go to the All Import Plugin and select “New Import.” Upload the file and set the post type; in our case, select “Properties,” then proceed to Step 2.
From there, you can see all the fields from the spreadsheet, and you don’t have to do anything in this step. Move to Step 3, where you’ll need to map all the fields. Start with the name: click on the name from the right side and drag it to the left side where it says “Title and Content.” For the images, drag the image field from the right side to the “Images” section, and select “download images hosted elsewhere.”
Then, click the Advanced Custom Fields add-on with the “thick property,” and drag and drop all your fields. Once finished, move to Taxonomies. When you have the data ready for the type of taxonomies, pick, for example, “Apartments,” and drag and drop the property type if they are Apartments, placing it in the correct box.
After finishing, save your template for future use, naming it “Programmatic SEO,” and move to step number four. Set a unique identifier; in our case, select the name, leaving all the default settings as they are, and click “Continue.”
Then, you’re ready to import your data. Click “Confirm and run the import.” When finished, all the data will be imported into the Properties app. You could check it by clicking “Properties” and then selecting any of the fields to see the custom post after they are imported. At this stage, we haven’t designed the content template yet, so we will do it in the next step.
#6: Designing Content Template with GenerateBlocks
With our data imported, it’s time to focus on the visual presentation of our real estate listings. Using the GenerateBlocks plugin, we’ll design a content template that is both visually appealing and optimized for SEO. This will ensure consistency across our listings and improve the overall user experience.
Now, we will need to design the content Layout using the Generate Blocks plugin. On your Generate Press tab, ensure that the elements are activated, then click on “Elements,” followed by “Add New Element,” and set it as a layout. From there, click on the content and set the content width to 1500 pixels. Click “Contained,” no padding, and then click “Update.” You can name this element “Programmatic SEO Layout.”
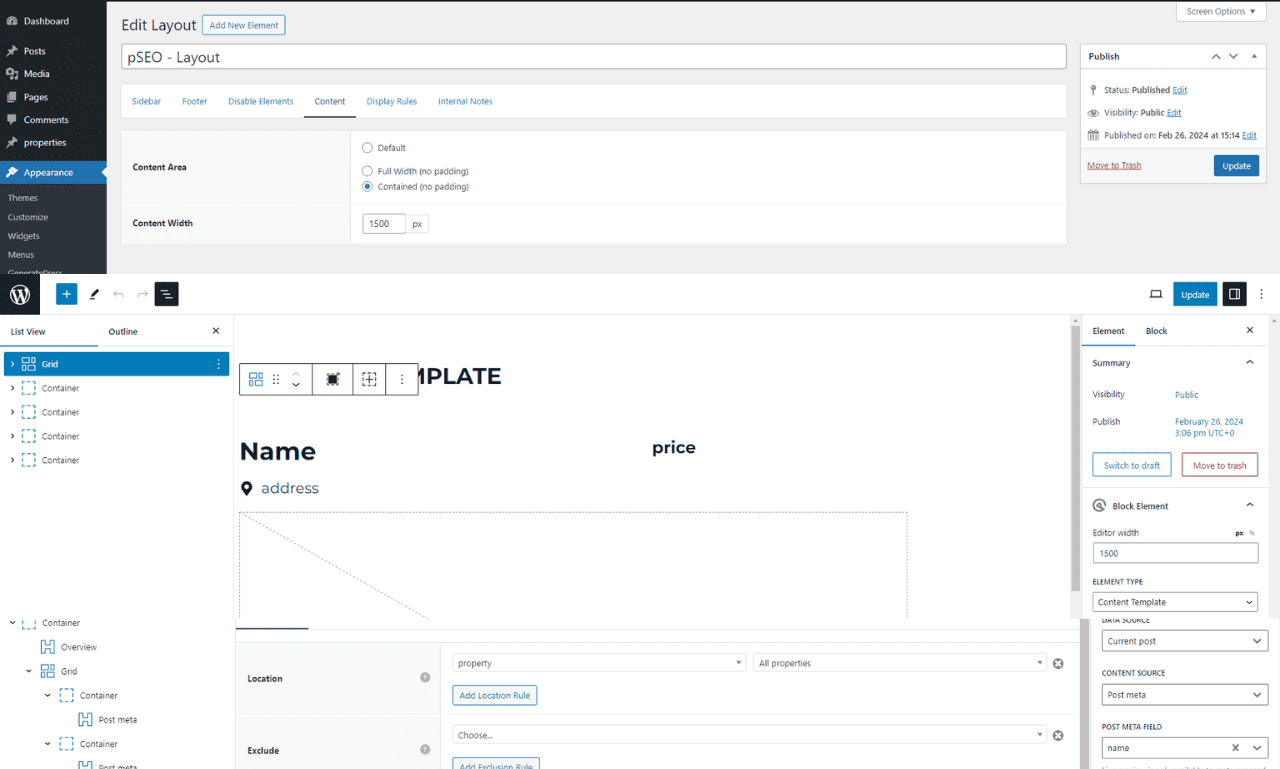
Next, we will need to create our content template. Click “Add New” again, and select “Block.” From there, choose “Content Template” in the element type. Select the width as 1500 again. At the bottom, where it says “Location,” select “Property, All Properties,” ensuring the content template is displayed only for properties.
In the content template, design all the fields. It’s how our listings will show up when visitors click on any of our records. Start with the H1, which is the title. Create a grid of two containers. In the first one, create a heading post out. Ensure it’s H1. Then select “Dynamic Data,” leave it as the current post, select “Post Meta,” and pass our title from the ACF plugin, which is “Name.”
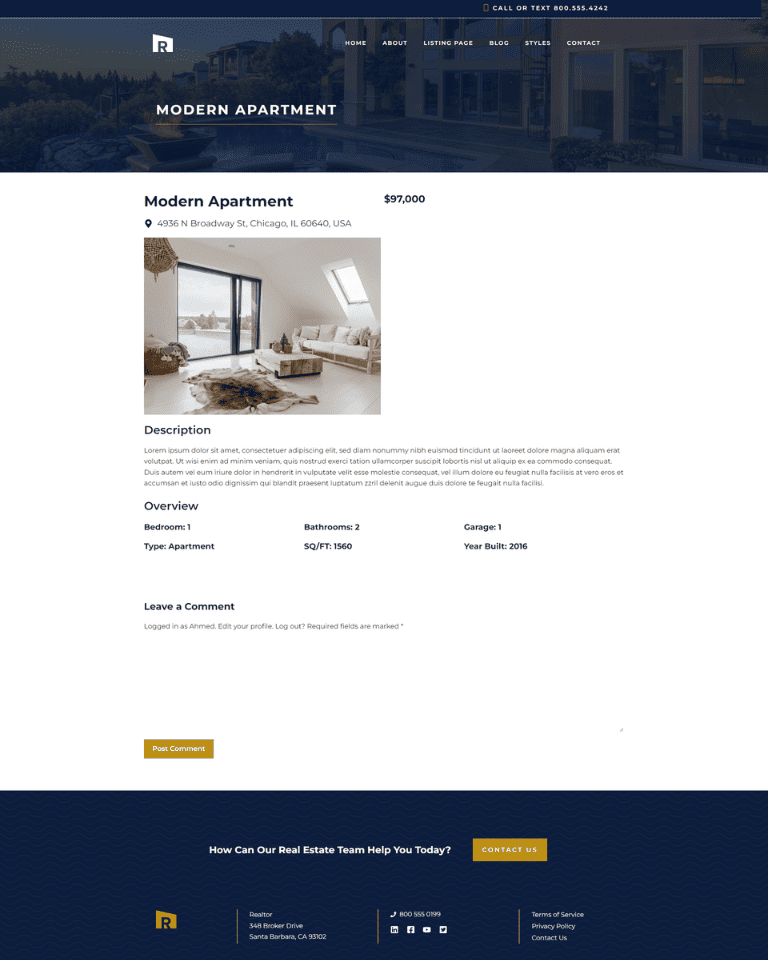
In the second container, display the price of the property. Set the field as a heading, H2. Enable “Dynamic Data,” select “Post Meta,” and then choose “Price.” Design all the other fields, such as the address, image, description, and all other fields, and click “Update.” Now you can see how the layout would look like.
By following these step-by-step instructions, you’ve successfully created a programmatic SEO website tailored for the real estate niche. With WordPress as your CMS and the right combination of plugins and tools, you can build a high-performing website that not only attracts visitors but also ranks well on search engines.
We hope you found this tutorial helpful. If you have any questions or feedback, feel free to leave a comment below. And don’t forget to subscribe to our channel for more tutorials and tips on SEO and website development. Thanks for reading, and best of luck with your real estate website!
Frequently Asked Questions
Building a real estate website with WordPress is a straightforward process that can help you showcase your listings and attract new clients.
If you have authority and existing clients, you can go for Elementor, and if you are just starting out, you can use any Gutenberg builder such as GenerateBlocks, Spectra, and Kadence Blocks.
You can use plugins if your theme doesn’t support importing listings into your website, such as WP All Import.
You can use WPForms, Ninja Forms, or Gravity Forms.
You can use Elementor’s built-in feature to add maps. For Gutenberg page builders, you can use Spectra or Kadence, which have this feature available, and you don’t need any API keys.
